Installing your own sprinkler system can be a pretty big job, but it’s doable if you’re handy and have some basic plumbing knowledge. Before you begin, however, it’s important to consider the steps, the parts necessary, the cost, and wether it’s worth it to take on the task yourself.
You can build your own large sprinkler system using PVC pipe, fittings, sprinkler heads, valves, and controllers. The process can take several days or weeks, and the materials alone are likely to cost between $200 and $500. Permits and additional equipment may be necessary in some areas.
Let’s take a closer look at what you’ll need to do to make your own sprinkler system, how much it might cost, and other factors to keep in mind as you proceed.
Before making your own sprinkler system, you’ll need to learn about your water supply situation. Find out the water pressure in your area, the GPM (gallons per minute), and the size of your water service line and meter or well pump.
Once you have this information, you can begin designing your irrigation system.
Designing Your Irrigation System
To design your irrigation system, you’ll need to map out your yard and determine the size and shape of each zone. You’ll also need to know the soil type in each zone and the amount of sun and shade each area receives.
Begin by drawing a rough sketch of your property, noting the location of all buildings, trees, shrubs, and other obstacles. You’ll also need to know the dimensions of each zone and estimate how much water they need.
Obtain Required Permits
Some cities and states require a permit for installing a sprinkler system. Before you get started, check with your local government to see if a permit is required in your area.
Purchase Supplies
The most important part of your system will be the sprinkler heads, which come in various styles and sizes. You can choose the best type for your needs based on the pressure and GPM of your water supply and the size and shape of your zones.
Then purchase irrigation pipes, fittings, valves, risers, and other accessories, such as an automatic timer (on Amazon), based on the size and needs of your system. Be sure to purchase high-quality materials that are durable and will last for years.
You may also need to purchase a backflow preventer, which most municipalities require. This device prevents contaminated water from flowing back into your water supply.
Plot the Layout
Using spray paint, flags, or stakes, mark where each sprinkler head will be placed. Factor in the spacing of the heads, as well as the radius and arc of each head.
You’ll also need to mark the location of each valve, riser, and other accessories. Once everything is marked, you can begin digging trenches for your pipes.
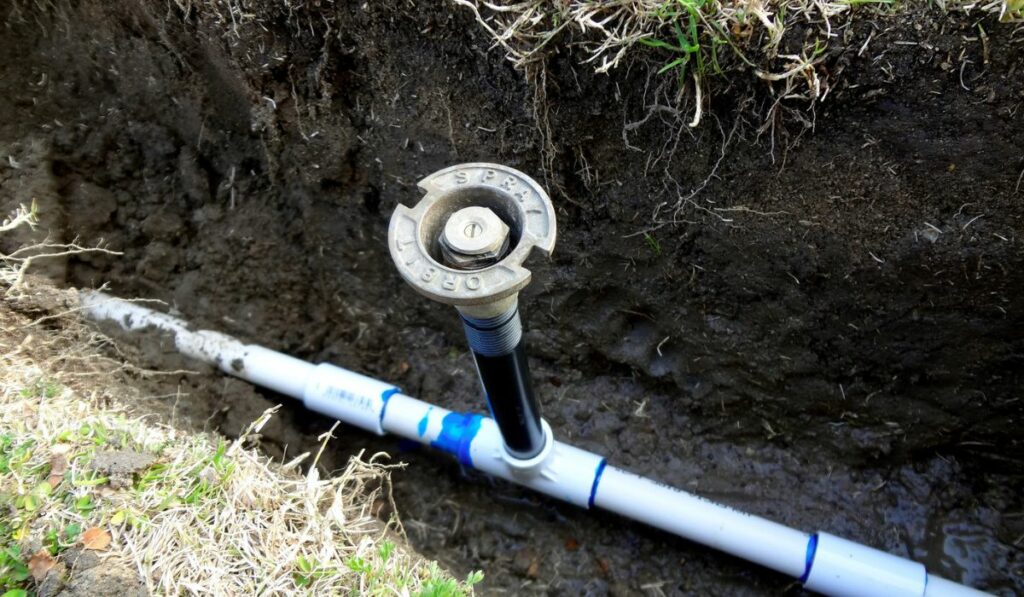
Dig Trenches and Install Pipes
Using a shovel or trencher (on Amazon), dig trenches at least 8 inches deep and 4 inches wide to accommodate your pipes. Be sure to avoid any obstacles, such as tree roots and underground utilities.
Lay the pipes in the trenches and connect them with fittings. Make sure the pipes are properly supported and leveled.
Connect to the Water Supply
After installing the pipes, connect them to the main water source by attaching the control valve to the supply line. You can have different valves for each zone if needed; this will allow you to regulate the water flow of each location.
Install the Sprinkler Heads
Install the sprinkler heads in each zone, attaching them to the risers. Be sure to factor in each head’s spacing, radius, and arc when installing them to provide adequate coverage.
Test Your System
Turn on the water supply and check for any leaks or other problems. Ensure the sprinklers evenly distribute water across your lawn and perform any necessary adjustments or repairs. Once your system runs smoothly, you can add an automatic timer to regulate the irrigation process.
Bury the Pipes
You can bury the pipes once your system is properly installed. Be sure to backfill the trenches carefully and compact the soil around the pipes to prevent settling.
How Much Does It Cost to Install a Sprinkler System Yourself?
The average cost of a complete do-it-yourself sprinkler system is between $200 and $500.
The main cost of installing your own sprinkler system is the equipment, which can range in price from $100 to $300 depending on the type and number of sprinkler heads you need. If you need to purchase a backflow device or rent equipment, that will add to the cost.
Another cost you’ll incur is the time it takes to install the system. Depending on the size and complexity of your system, it could take a few days or weeks to complete the installation.
Finally, there’s the cost of possible mistakes. If you’re not experienced with installing sprinkler systems, there’s a good chance you’ll make a mistake or two, which could lead to having to replace parts of the system, which can be costly.
What Supplies Will You Need?
To install a sprinkler system, you’ll need the following supplies:
Sprinkler heads (rotor, impact, and/or bubbler)
Pipe (PVC or polyethylene)
Pipe fittings (elbows, couplers, tees, etc.)
Backflow device (if required by your city or state)
Valves (solenoid and/or manual)
Controller (automatic or manual)
Timer (optional)
You may also need to rent or purchase some of the following equipment:
Trencher (for digging trenches)
Pipe cutter (for cutting PVC or polyethylene pipe)
Pipe threader (for threading PVC pipe)
Pressure gauge (for testing the system’s water pressure)
Additional costs you may include:
Permits
Soil testing
Landscaping (if you need to repair your lawn after installation)
Other components you may need depending on your specific system include:
PVC glue and primer (for PVC systems)
Compression fittings (for polyethylene systems)
Risers (to raise sprinkler heads above the ground)
Hose bibs (to connect the system to an outdoor faucet)
Cost can quickly add up, so getting an estimate of all the supplies and equipment you’ll need before starting your project is essential.
DIY vs. Hiring a Pro: Factors to Consider
When deciding whether to install a sprinkler system yourself or hire a professional, there are several things you need to consider.
If you decide to go the DIY route, you can purchase the sprinkler system’s components for around $500. You’ll also have to factor in the cost of any necessary tools and supplies, which could increase the project’s overall cost.
Time Commitment
Installing a sprinkler system is a major project that requires significant time and effort. If you’re planning to do it yourself, be prepared to set aside several weekends (or more) to get the job done.
Hiring a professional will take less time overall since professionals have the experience and expertise to complete the job quickly and efficiently.
Experience and Expertise
Installing a sprinkler system is not a simple task. A lot can go wrong, and if you’re not experienced with plumbing or irrigation, you’re likely to make mistakes that can be costly and time-consuming to fix.
If you’re not confident in your abilities to install a sprinkler system, it’s probably best to hire a professional.
Warranty and Maintenance
When you have a sprinkler system professionally installed, the company will typically provide a warranty for its work, so if anything goes wrong, they will come out and fix it free of charge.
If you opt to go the DIY route, you won’t have a warranty, so if something goes wrong with your sprinkler system, you’ll have to pay to repair or replace it.

")
")
")
?")
")
?")

