When it comes to DIY decking, it is important that you get the groundwork right, so that the final result is one you can depend on for years to come.
You’ll find two primary methods, one being the simple, easy one that negatively impacts the overall quality of the decking, and another that requires more effort and additional skills but gives far better results.
This article will take you through both, so you know exactly what you’re doing, no matter what your abilities.
First thing first, you want to outline the bare shell of your decking, by hammering pegs at each corner, then using builder’s line, run a guide between them to indicate the total size and shape of the surface area.
Once you know where the decking will go, it’s time to remove any rocks, as well as removing any weeds, plants or other debris and obstructions that could get in the way of laying the foundations.
After the area is cleared, it’s time to dig – you want the whole thing to be a hole that’s approximately fifty milimeters deep, being sure to get rid of any turf on top so you’re only having to dig through bare soil and nothing more solid.
When your 50mm hole is ready, you need to make sure the ground where you’d like the decking to be is even; using a flat surface like a piece of decking board is fine, just lay it on the ground and pop a spirit level on top. Should it be uneven, you want to level it out with additional soil, or push down and compact to make sure everything is nice and flattened.
Here’s where those two alternative options come in: it’s up to you whether you build the decking directly on top of the ground, or if you’ll take the extra time needed to square the site, then add risers to build the deck on top of, so it is “floating”. It’s more than fine to build directly on the ground, but it’s more likely to absorb moisture this way, and could require more maintenance and wear out easier in the long run.
One way you can mitigate this if you’re laying decking directly is to cover the entire space with some weed control fabric, before adding between 35 and 50 mm of gravel directly over top.
Otherwise, it is advised that you should make yourself some concrete blocks or “pads” for the decking to sit directly on top of, preventing moisture from leaking into the wooden frame and causing it to rot, which can quickly lead to damage that costs more to fix up than the effort required to take this extra step! In order to get this right, you first need to “square” the site of the decking, for which you’ll find a handy Youtube tutorial to follow right here.
Once the site is squared up or ready to go, it’s time to use a combination square to measure out your deck boards, ready to cut them down to size. Leave a mark in sharpie at the appropriate position to make sure everything is nice and even, before cutting carefully.
Before placing things down permanently, it makes sense to then lay out the boards in your chosen design, being sure to leave appropriate gaps for expansion in between each board – usually between five and eight millimeters along the length of your timber, and three millimeters along the end.
Doing this will allow you to check you have enough decking to finish the job – if you notice the timber appears to overhang on top of the frame, shrink your gaps a little, but don’t go any smaller than 5mm.
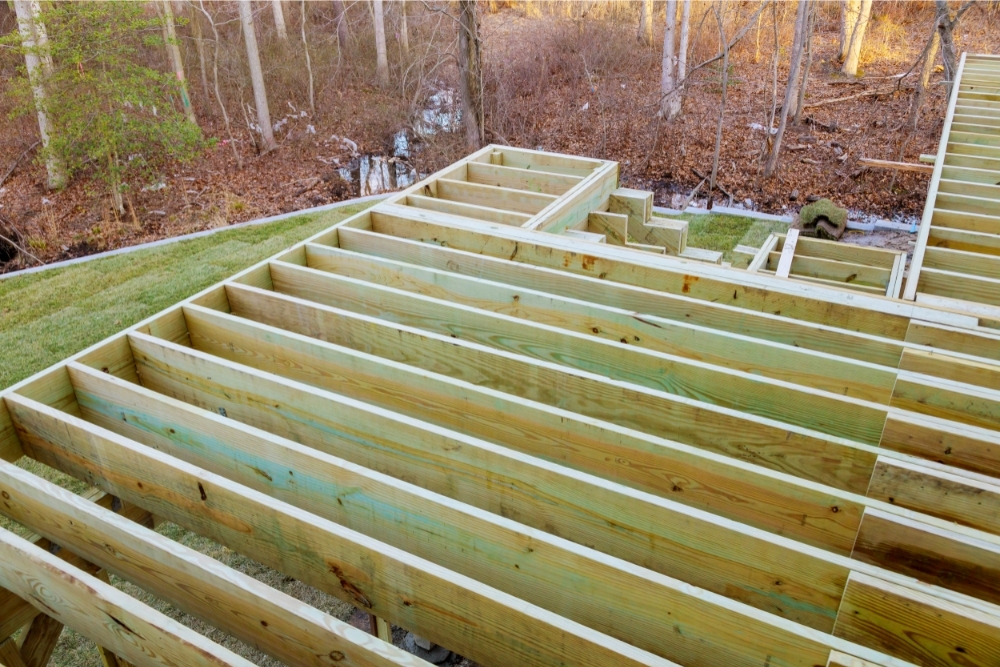
Now it’s time to measure out the frame and cut it to size – hopefully, you’ve got four outer joists – the number of inner joists will be determined by the shape and size of the deck you’re looking to have. For horizontal deck boards, you need joists that leave no more than 450mm between each support, whereas diagonal or chevron boards will require joists 300mm apart.
In order to get everything nice and symmetrical, use a pencil to make two marks on every end of the frame’s outer joists – the ones that sit at right angles to the inner joists. Said pencil marks should sit in alignment with the center of any adjoining joists, requiring eight marks in total – two in every corner of the outer joist’s frame.
Now use a flat wood drill bit to create a little hole at each mark – these should be no deeper than the screw’s head, and wide enough that you can use a socket or a ratchet to tighten them; known as a countersunk hole, it allows your screw heads to sit flush with the surface, so nothing sticks out and causes a hazard.
With a slightly thinner, smaller drill bit, you should then drill a pilot hole right through the center of the recess between the outer joist and its adjoining support, which helps you properly guide screws into their intended holes without splitting any of the wood.
Use either a drill or a socket and ratchet to fit the coach screws – it can be easier to drill the above two holes and fit the screws one corner at a time, rather than doing everything at once, as this can make things a lot less confusing.
Once you’ve finished building your square frame, that’s the ground ready for a decking! All that’s left to do is add in your inner joists, which are used to divide the square frame evenly so that the deck can be laid.
With the inner joists, you should follow the same process as outlined above for the outer ones, the only difference being that two coach screws are required to be pushed through the exterior frame into every end of the inner joist, for security. Once that’s done, you can go ahead and lay those boards!
?")
")
")
")
")


")