If you’re looking for a good alternative to hand-watering your lawn — especially on hot summer days — then a soaker hose might be just the thing need. But what exactly is a soaker hose, and how does it compare to the other irrigation options?
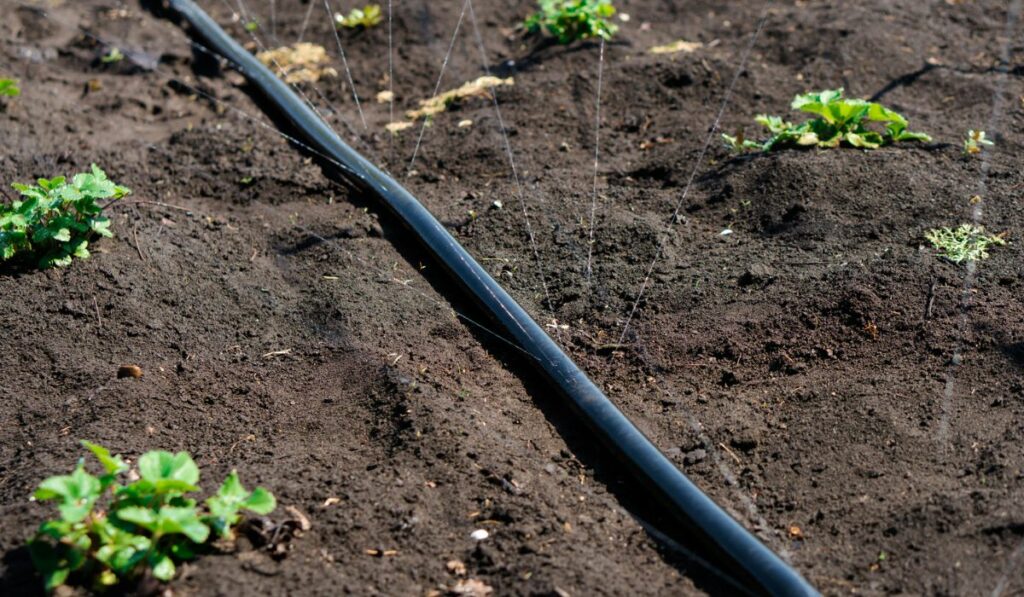
A soaker hose is a garden hose punctured with small holes. The water slowly seeps out and directly toward plant roots. It’s best for small gardens on level ground as well as for watering raised beds and perennial borders. It’s also easy to install, making it a great choice for beginners.
Whether you’re looking to water your trees, shrubs, or perennial beds, a soaker hose is worth considering. Let’s take a closer look at what soaker hoses are, how you can install them, and how much they cost. We’ll also go over what soaker hoses are best for and if they’re more efficient than other watering methods.
A soaker hose is pretty similar to your typical garden hose. The only (important) difference is that the long, flexible tube has small holes throughout the length — or is made of a porous material that allows water to seep out.
Soaker hoses are typically made of polyethylene plastic or rubber, but you can also find options made from BPA-free polyurethane if you want one for your vegetable garden. They usually come in a round or flat shape and are available in different lengths (generally 25, 50, or 100 feet).
Round Soaker Hoses
A round soaker hose (on Amazon) is typically made from vinyl or rubber. It has numerous small holes throughout its length to distribute water evenly and slowly. Compared to their flat counterparts, round soaker hoses are more durable thanks to their high porosity level and round structure.
Plus, most gardeners prefer round hoses since you can bury them more easily than you can bury flat soaker hoses. They can also last for longer throughout different seasons.
Flat Soaker Hoses
A flat soaker hose (on Amazon) is usually made using nylon-coated mesh. It only has holes on one side and acts pretty much like a sprinkler since it distributes water to only a particular area.
Because a flat soaker hose is flat, you can’t roll it out – it’s fixed in one place. But you can easily snake it around your plants.
Just like round soaker hoses, you can bury flat soaker hoses under mulch, but make sure not to bury them too deep since they can break and disrupt the water distribution.
What Is a Soaker Hose Best for?
Soaker hoses are ideal for small gardens that sit on level ground. Considering how they’re easy to install and don’t demand a high initial investment cost, they’re a good option for raised beds, too. They’re also an effective option for watering gardens, perennial borders, shrubs, and trees.
Plus, since they’re simpler to use and easier to install and configure, soaker hoses are often the first choice for beginner gardeners. They’re also commonly used for personal use, since you just need to connect them to a tap and start watering.
What’s the Average Cost of Installing a Soaker Hose?
The average cost of installing a soaker hose depends on the soaker hose and faucet end components that you opt for. While a soaker host itself usually costs $0.25-$0.60 per linear foot, the cost of the other components can vary a lot depending on the brand you opt for.
To give you a rough idea of the costs, let’s discuss the other things you’ll need.
Soaker Hose Components
To determine the soaker hose components you need, you first need to determine how water will travel from the tap to the hose. You can either use a garden hose and extend it all the way to the bed that you want to connect, or build an in-ground network of pipes to direct the water.
Once you figure that out, you’ll need a tubing adaptor that screws onto the hose or pipe end and narrows down the flow such that it fits into a soaker hose. This adapter is typically included in soaker hose kits, but you can also find them separately.
You’ll also need a few couplers. You might need straight pipes, corners, and tee couplers depending on the orientation you’re going for.
For instance, you can use a tee fitting to make a loop that you can then use around a plant or a tree. Similarly, you can use it to make lines that run through a bed. Meanwhile, straight pipes join hoses together, and corners direct water flow around corners.
You’ll also need an end cap (on Amazon) to close the hose’s open end. You won’t need it for ring-shaped hoses but you’ll need a few of them for flat hoses.
Faucet End Components
You might need some components for the faucet end as well, depending on the setup. For one, a pressure regulator (on Amazon) is always good to have since it makes sure to slow down water before it reaches the soaker hose. This helps prevent bursting hoses and tears.
Most residential water systems regulate the water, but the water pressure levels in a soaker hose might vary. While some are rated for just 10 PSI, others can handle a higher water flow. So, if you have a low-pressure hose, make sure you get a pressure regulator.
You should also consider investing in a water filter at the faucet end, especially if you get hard water with mineral deposits. The filter can prevent the deposits from making their way into the soaker hose.
And if you’re going to install numerous soaker hoses, it’s best if you add a hose splitter after the pressure regulator to split up the watering pattern. With a splitter, you can run multiple hoses from one faucet.
Finally, another thing you can add is a timer.
Do Soaker Hoses Conserve More Water Than Other Methods?
Soaker hoses are known for being highly efficient because of the way they distribute water. When you water by hand or use a sprinkler, you tend to use more water than needed — and most of the water never really goes down to the roots. Instead, it’s mostly delivered just to the leaves, causing problems like rot and mold.
However, a soaker hose delivers water right near the roots, where it’s absorbed as needed by your plant. Plus, since water seeps out from the entire length instead of just the hose end, the water coverage is more efficient.
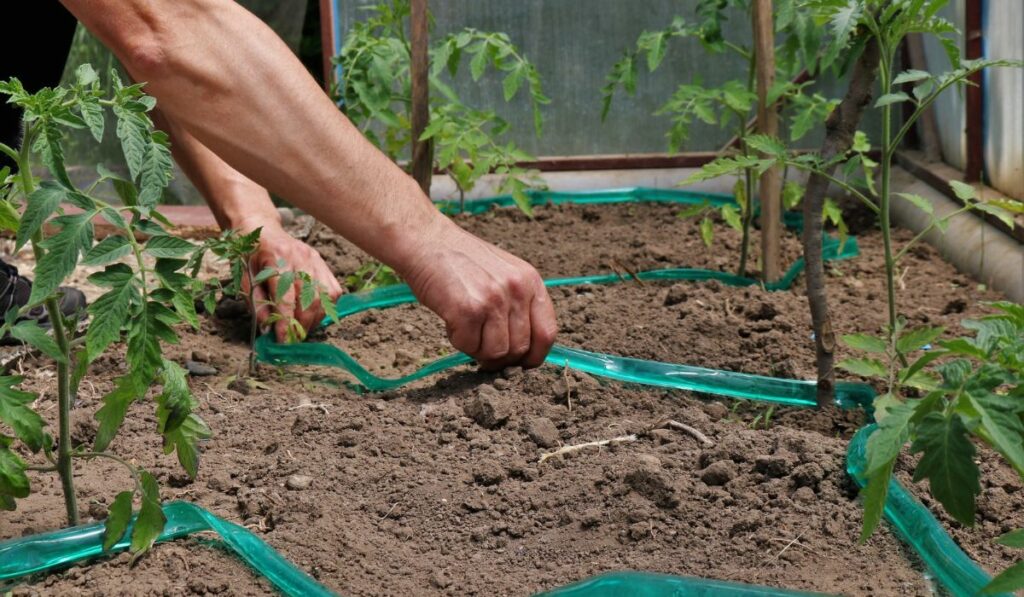
How to Install a Soaker Hose
Installing a soaker hose can be divided into two parts: planning the installation and the actual installation.
Planning
To install a soaker hose, you first need to determine what you want to water. Do you want to water a flower bed, a foundation, trees, or a vegetable garden? You need to determine this so that you can identify where you need to place the hose.
Next, you need to determine how long to run the soaker hose. In general, it shouldn’t be more than 25 feet long for the best functionality. That’s not to say that you can’t get a 50-foot hose; you can, but then the second half will get reduced water flow.
For trees, you can make a loose loop around the tree’s base. For a mature tree, 2-3 feet from the tree trunk should be fine while for young trees, you should have it closer (around 6-12 inches away). Just make sure you don’t put it right against the trunk.
In the case of a vegetable garden, you can also make a loop if you only have a few plants that you want to water. For numerous plants in rows, you’ll have something more elaborate — like an extended E, where numerous soaker arms are attached to a regular hose.
Installation
With the layout planned, you can go ahead and start with the installation.
If you have a new soaker hose, unwind it and leave it under the sun for around an hour to loosen it. This will make placing it much easier.
Take out the end cap and connect the hose to a tap or other water source.
Switch on the water supply to flush the hose and get rid of any debris.
Place the end cap back.
Now, cut the soaker hose to the length you need for the layout you’ve planned.
Tip: If you’re not going to make a loop, put a hole plug at one end and the correct connector at the other. If you’re going to loop the hose, connect both ends to a tee connector.
Once you’re done assembling, attach the hose to the water source.
Tip: If the area you want to water is close to the tap, you can directly connect the hose to the spout. But if you need more length, you can connect a garden hose to the main water source and then hook up the soaker hose to it.
Stretch out the hose and switch on the water. Adjust the pressure until you get a slow and steady drip.


")


