If you own a garden, you should consider getting a hose-end sprayer. With this innovative tool, you can easily spray pesticides and fertilizers evenly across your yard. But how do you use a hose-end sprayer once you’ve got one?
Different kinds of hose-end sprayers require different techniques. Generally, however, you connect the hose to the sprayer and turn it on to siphon the liquid into the container, mixing with your chemicals. This liquid will go through the spray head and out through the other side.
Let’s now talk about the different hose-end sprayers and how to use each of them. Then, for better application of chemicals, you need to know how to calibrate your hose-end sprayer. As we proceed, we’ll explain that in full detail.
Turning on the sprayer activates the spray head, which shoots water out of the other end. A suction or vacuum is created when water passes through the spray head’s top, pulling the liquid product up to the top.
It mixes with the water in the hose and is sprayed out. The hole on the siphon tube on many hose-end sprayers can be closed off with a knob or button so that you can spray water only when necessary.
Many hose-end sprayers have just one hole below the spray head, but others have multiples holes, and you can select any of them. Either way, the size of this hole will determine how much liquid product will be siphoned for every liter of water that you spray.
Hose-End Sprayer Types
There are three hose-end sprayer types: fixed-rate, adjustable flow/rate, and ready-to-use.
Fixed-Rate: A fixed-rate sprayer is as its name suggests — fixed! That means the sprayer siphons fluid from the bottle and out the nozzle at a set pace. To guarantee that the liquid is distributed correctly, you should adequately mix the concentration before applying it to the container. For a simple fixed-rate sprayer, check out the Chapin 20-Gallon Sprayer (on Amazon).
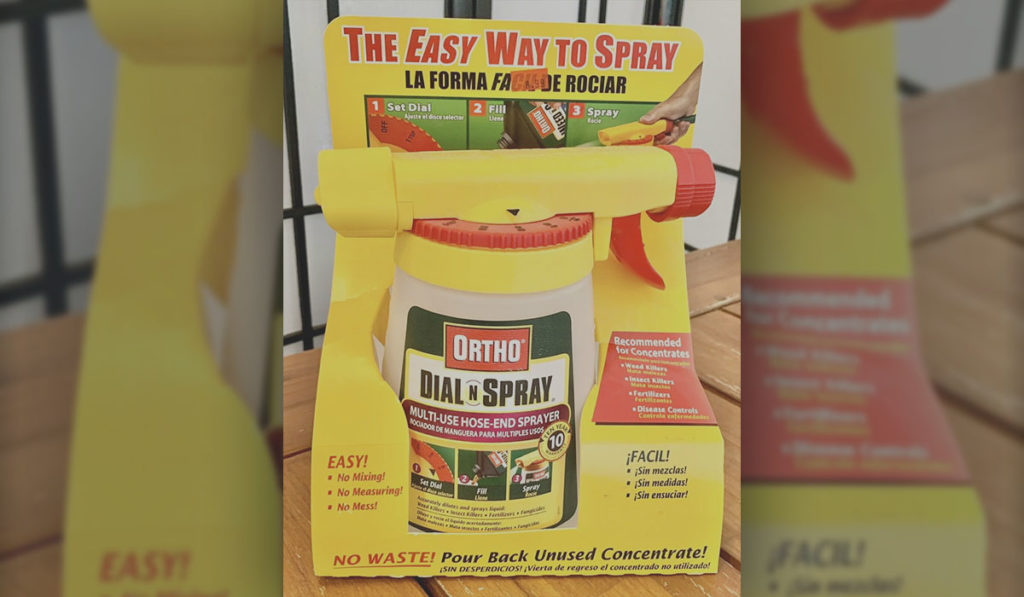
Adjustable-Rate/Flow: This type of sprayer has a dial that allows you to control how fast the liquid leaves the bottle. Unlike the fixed-rate sprayer, you don’t have to worry about mixing any concentration. An example of this type is the Ortho Dial N Spray Sprayer (on Amazon).
Ready-to-Use: Although fixed- and adjustable- rate are the most popular hose-end spray types, some manufacturers produce ready-to-use sprayers like this SeaMate Sprayer (on Amazon). These usually contain the brand’s spray liquid and are preset to be attached to a regular garden hose. They also spray at a pre-set rate. The downside of this sprayer is that you can only use it with the product that comes with it, so it’s basically a single-use sprayer.
How to Use a Hose-End Sprayer
Although the three hose-end sprayer types are pretty similar, they still have some differences in their applications. That’s why you need to know how to use each of the sprayers.
Let’s take a look at their application below. Note that while using a hose-end sprayer with chemicals, you should use eye protection and rubber gloves.
Fixed-Rate Hose-End Sprayer
To use a fixed-rate hose-end sprayer, you have to premix the fluid before applying it since you can’t control the flow of the liquid exiting the container. You can check out how to do this by reading the instructions on the product packaging.
Fill the container with the right amount of chemicals and water to get started. Then, attach it to the nozzle and shake vigorously. Connect the hose to the sprayer and turn on the water halfway. Open the sprayer faucet as soon as the water comes out of the nozzle. Evenly spray the mixture across the area by walking uniformly across the vicinity.
When you’re done, shut the valve and remove the leftover mixture. Once you’ve mixed the substance with water, you can’t keep it to use later. After you’ve discarded whatever’s left in the bottle, fill it with water and use the sprayer and hose to clean the bottle.
Adjustable-Rate Hose-End Sprayer
For an adjustable flow/rate hose-end sprayer, pour the liquid into the sprayer’s container. Then pour the concentrate (undiluted) into the bottle. The quantity you’ll need depends on the area you want to spray, so you have to check the instructions on how much to use.
Most spray bottles have measurements on their sides, so you can always fill them up to the level you want, but you can also use a measuring cup to be more accurate. You can use a measuring spoon if you only need to spray a small area.
After pouring the required concentrate, change the dial. You can find the application rate on the concentrate bottle. Although the position of dials varies per sprayer, they are quite easy to operate. You just have to move the dial to the point on the indicator that shows the number of liters/gallons you want to spray.
Once you’ve set the dial, attach the hose firmly to the sprayer while also ensuring that the faucet isn’t switched on. Turn the pressure to about 3/4 and adjust the nozzle tip to ensure that the area is evenly covered. With the sprayer’s handle, spray the area you want to cover. Walk evenly for the same amount of the mixture to reach every part of the yard. You can reduce the pressure if the concentrate is more than it should be.
Unlike the fixed-rate sprayer, where you have to discard leftover concentrate, you can return the remaining amount back into its bottle. Afterward, pour water into the sprayer, place the dial at the highest level, and empty the bottle by spraying the water through the hose. Doing this will clean both the bottle and the spray head.
Ready-to-Use Sprayer
Since ready-to-use hose-end sprayers aren’t all the same, their mode of operation might differ, so you need to read the instructions for proper usage. Still, there’s a general method of use.
Since the concentrate usually comes in the bottle, you have to turn on the hose and set the knob or switch to the mix setting. Spray the area evenly by walking steadily.
If you haven’t used up all the concentrate in the bottle, you can reapply across the yard until you’ve used up the required amount.
How to Calibrate a Hose-End Sprayer
The only way you can get the best out of a chemical — whether it’s fertilizer or pesticide — is if you adequately mix and spray the substance. But much more than getting the quantity of the liquid right, you also need to calibrate the sprayer as well.
It’s easy to calibrate your hose-end sprayer, but you need some tools to do that. The tools you need are:
Stopwatch/Mobile Phone
Jug/Bucket
Brush
Measuring Tape
Flag/Posts
Once you have all these items, you can calibrate your sprayer with the following steps:
First, measure the nozzle distance to help you determine the travel distance.
With your measuring tape (it should measure more than 200 ft.), measure the travel distance, preferably the average distance. Use the flags or posts to mark the spots. If you have it and want the distance measurement to be faster, use a trundle wheel.
Measure time: Set your sprayer at a regular rate and spray while using a stopwatch to calculate how long it takes to reach the posts/flags. Once the spray crosses the posts, stop counting, and repeat the process twice or three times to get the average time.
Set the sprayer pressure.
With a jug or bucket, calculate how much water is leaving the sprayer. Use the same pressure and let the water run for the time you calculated above. Like step 3, repeat this process twice to get the average.
Usually, most chemical containers indicate the quantity, so you should compare your calculation with the one on the container. If there’s more than a 10% difference between both values, you should clean your nozzle with a brush.
At the end of the calculations, your ounces per acre should be 5% of the necessary rate. If the calculation doesn’t provide this value, you need to adjust the water speed and sprayer pressure and repeat the process from step 3.