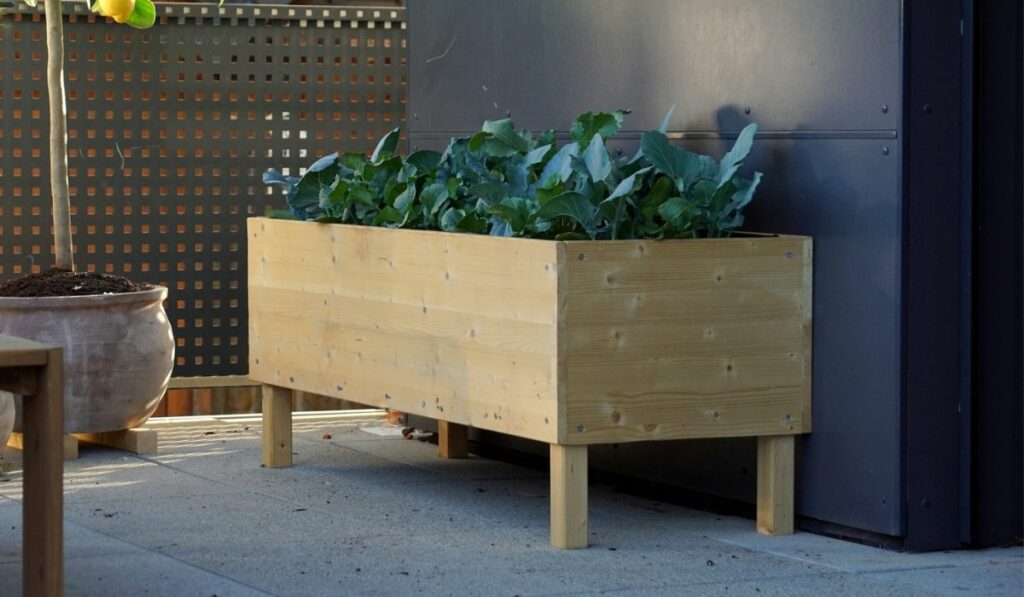
A raised garden bed with legs looks gorgeous and easy to build. However, there are several things to consider before starting your project that is hard to reverse once you get going.
A raised garden bed with legs should be 10 inches deep, and then however high you’d like it (with legs). Compared to building a normal raised bed, in general what you are adding is feet and a bottom. But there are several more details to consider, like the lack of insulation from the ground.
Once you know what you want to plant, everything else comes easy. Building the raised garden bed can be done in a few hours, but it may require help from someone else to maneuver the bed and flip it right side up. However, besides needing an extra set of hands, the process is pretty simple once you have gathered all the materials.
The main concern when building a raised garden bed with legs is the depth of the soil. Unlike a raised garden bed that sits on the ground, plants can’t extend their root system further than the bottom of the built bed. This leaves a problem in how much a plant can grow.
If you have a plant with an extensive root system, like beans, you’ll run into problems with the roots unable to go as deep as they need to for the plant to thrive and produce lots of produce. Generally speaking, a raised garden bed on legs should be roughly 10 inches deep, enough that most roots can securely grow and flourish.
What to Keep in Mind Before Building
When building a raised garden bed on legs, there are several things you should consider before jumping into the project.
Type of Plants
With a bottom on a garden bed, the roots can only extend so far, making the need to consider what plants would fail to thrive in this enclosed environment.
For instance, deep-rooting produce like artichokes or asparagus would not do too well in a closed bottom garden bed since their roots would bottom out, and the plants would never reach their full potential.
Another thing to consider is the developed produce and how the plant tends to grow them. For example, long vining plants with heavy fruits like pumpkins, watermelon, or zucchini might cause issues as the vines extend over the edge and the fruit becomes heavier. Also, with the fruit suspended in the air, the vine could snap when it becomes too large.
Location
Once a raised garden bed on legs is built and filled with soil, it can become incredibly heavy to move. So, before building your garden bed, consider its location and attempt to find a spot that won’t require regular moving as the seasons change.
Sunlight
Knowing the hours of sunlight your desired location will get is essential when determining what to plant and where to plant them. Most vegetables need full sun, but if you plan to grow flowers or different varieties of vegetation, you need to consider if some shade is necessary for optimal growth.
Soil
The benefit of building a raised garden bed is the opportunity to pick your soil. Whether heavy with clay or light with sand, knowing the type of soil you need is essential, as it will affect everything you plant within the garden bed.
Material
The type of wood your garden bed is made out of can determine it’s longevity. For example, cedar is mold and pest-resistant and can last roughly ten years, while pine is not resistant to anything and will only hold for a couple of years before breaking down. So, determine how long you want that garden bed to last and how much you are willing to invest in materials.
The first step is cutting the wood to the appropriate lengths. You will need the following measurements:
One by six boards, four sections, each 36 inches long.
One by six boards, four sections, each 24 inches long.
One by four boards, six sections, each 24 inches long.
Four by fours, four sections, each 30 inches long.
Step 2: Preserving the Legs
Wearing your latex gloves and using some cloth rags, dab the cut ends of the four-by-fours with copper preservative. Let them dry for an hour before continuing.
If you have purchased cedar four by fours instead of pressure-treated, skip this step.
Step 3: Attaching the Legs
Since we will be creating the bed in the upside-down position, lay out the four one-by-six boards. Two long, two short, on edge, on a flat surface to form a rectangle. The short pieces should be at the ends. On the board faces, screw the boards into the four-by-four legs with the four-by-fours standing on end, not flat against the ground.
Continue to do this for all four legs and make sure they are on the inside of the side boards. Once this step is complete, you should have four legs attached to the inside of the rectangle made of sideboards with all four legs up in the air.
Step 4: Attaching the Rest of the Bed Sides
Keeping the bed upside down, build a second rectangle, like the first, consisting of the one-by-six boards, but on top of the first rectangle.
To do this, place a long board on top of a lower long board and screw it into place at the four-by-four. Repeat for the opposite side and then do the two short sides the same way until you have that second rectangle on top of the first one.
Step 5: Measuring the Hardware Cloth
Roll out the metal hardware cloth on a flat surface and ensure it doesn’t curl up. Then, with someone’s help, place the garden bed, upside down, on the cloth. You want to leave about 2 inches on all sides before marking off the fabric with your indelible marker and something to form a straight edge.
Step 6: Adding the Bottom Slats
While you still have the bed upside down, add the six slats of one-by-fours onto the bottom. For each slat, you want to use two screws per end to firmly secure it since it will hold quite a bit of weight.
Step 7: Cutting the Hardware Cloth
Take the garden bed off the hardware cloth and turn it upright. Cut the lines you marked on the hardware cloth using the tin snips.
Step 8: Adding the Hardware Cloth
Place the cut hardware cloth on the bottom of the slatted tray of the bed. Press it upward on all sides and make a 1 to 2-inch cut, with the tin snips, into all corners of the hardware cloth. You want each corner to form a 90-degree angle. Staple the hardware cloth down once you are happy with the placement.
Step 9: Rolling out and Cutting the Landscape Fabric
Roll the landscape fabric lengthwise into the bed tray with the garden bed still upright. Make sure that you have an extra foot or two at each end. Center the fabric and then cut it off the roll with your scissors.
Step 10: Stapling and Trimming the Excess Landscape Fabric
Press the landscape fabric down and up the sides of the tray and staple it into place along the top of it. Trim any excess fabric that extends past the top of the bed’s sides.
Step 11: Adding the Soil to the Garden Bed
Cut the bags of soil and slowly add them to the garden bed tray. Do not suddenly add soil from a single side, as this will tip the bed.


")


