Now we’ve reached one of the most essential matters plaguing gardeners. Everything we’ve discussed in the other articles leads up to this – how to lay synthetic grass. So, you probably already know how to prepare the ground and the base material for your artificial grass. If you don’t already, then you’d better check out those articles before reading this one.
To lay synthetic grass, first, you need to check that you have enough grass to fill the desired space. Then carefully measure your pieces and scut them to size. Next, secure the grass on your base with nails. Finally, join and splice the sections to ensure a natural finish.
Compared to previous steps, this part of gardening DIY is quite simple. Still, you need to take extra care to lay your turf well because the grass is a core element of your garden. You can easily achieve perfectly installed synthetic grass; as long as you follow the steps we discuss here.
Check You Have All the Grass You Need

You probably weren’t expecting this step to be part of the process, since anyone installing artificial grass has probably sourced their grass already. Still, you need to make sure that you have enough grass for the job before you start anything.
You don’t want to start laying your grass, only to find out that you’re a few yards short, and have to dash out to get some more. This will slow down the process and waste your precious time.
To avoid this, triple-check that you have enough grass to cover your entire lawn. A good way to get this right is to measure the lawn as accurately as possible and purchase enough grass to satisfy that measurement. We advise that you even buy a little more than you’ll need, just to be on the safe side.
Measure and Cut Your Synthetic Grass Roll

As the previous step was more or less precautionary, you could say this is the actual first step to laying your synthetic grass perfectly. You need to know how to measure and cut your artificial grass so you won’t make any crucial errors.
Remember, you need to have measured your lawn before to know the number of grass rolls you need to cover the desired area. If you know you’ll need to make cuts in the grass, avoid making those cuts in the middle of your grass rolls.
Instead, it would be better to trim smaller pieces off the ends of your grass rolls, especially if you need to put this grass down on curved areas or corners.
Cutting the ends and not in the middle will also help minimize the number of turf joints, or gaps, your grass will have when laid. That’s another reason why it’s better to purchase more grass rolls than needed to cover your lawn.
More Information About Cutting
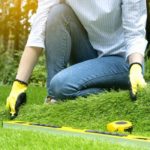
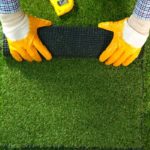
Before you make any cuts or trims, roll out the synthetic grass fully and measure out the parts that you need to cut. Doing this will prevent mistakes from being made and avoid you ruining the turf.
The tool you use to cut the grass also matters a lot. Synthetic grass is pretty solid, so you’ll need a strong blade to pierce through that material precisely. Purchase a sharp utility knife with replacement blades for this job. A good example is this CRAFTSMAN Utility Knife Blades (on Amazon).
Slowly cut the material. We’d recommend putting cardboard or wood under the grass to make it a little easier to slice through. Check your progress often as you move along your measured lines, realigning your blade if necessary and cutting with an “up and back” movement, so as not to damage the grass.
Avoid narrow sections. Grass tends to bunch up between cuts if the sectioning is too narrow; meanwhile, if there’s enough space between turfs, the grass fibers will cover up those gaps and make those spaces invisible. The result will be a much more natural-looking lawn.
Place Your Turf
This is the time when you will fix the synthetic grass to the designated area. Before doing this, let your grass rolls sit in the sun to allow the turf blades to rise as much as possible.
When you’re moving the grass across the yard, don’t drag it- carry it. This will avoid damage or flat turf blades. At this point, you may need to enlist the help of someone nearby, as synthetic grass can be pretty heavy.
If you’re installing more than one roll, it’s advised that you place it so the blades all face the same direction. If they don’t, your lawn will look less uniform and beautiful.
How you position your turf also matters a lot. If you look at your lawn from the side where the blades blend together, it will look much more natural. So, it’s usually best to have this “natural” side of your turf facing your most frequently used outdoor living areas, or your house.
Splice the Synthetic Turf Cuts Together
At this stage, all that’s left to do is actually secure the grass to the ground. You can do this in two ways: joining tape and glue, or nails and staples. Both methods can be used independently, or you can combine both to make your grass more secure.
Joining Tape and Glue
Joining tape is used to fix the edges of two rolls of synthetic grass together. This tape has two sides – a shiny side and a textured one. The tape should be placed on the ground between the joining edges of turf, with the shiny side downwards. The joining glue should then be applied on top of the textured side, and the grass secured on it.
You can effectively use different types of joining tapes and glue, but this Duck Brand Carpet Seaming Tape (on Amazon) is a trusted option. This J-B Weld 8281 Adhesive (also on Amazon) would be a good choice for the adhesive.
Nails and Staples
After using tape and glue (if you chose to use both methods), hammer down 6-inch waterproof nails to secure the synthetic grass around the edges. These nails must be long enough to go completely through the base and into the ground.
Space these nails 10 to 12 inches apart for the best result, and be careful to not nail down any of the grass blades while you’re at it.
Conclusion
So all that’s left to do now is add the infill between your synthetic grass panels to give it a more natural feel. It sounds easy, but like the rest, there’s a technique to ensure the best result. But don’t worry; we have another article to help you out with that. Check it out and you’ll have the lawn of your dreams in no time.

